Manhattan Bridge 4″x5″ shot

Well it’s been a while since I posted something, I was busy refining my “mirrorless” approach.

Here is my latest “usable” SpeedGraphic shot, taken the morning before hurricane Sandy struck NY.

I guess bringing spare FP4 sheet “just in case” was a good idea since the blackout prevented me from buying or processing any film sheet or roll during my stay (which is the least of concern when a hurricane stikes, I know…)

4x5_FP4-125-FX39_90mm

4x5_FP4-125-FX39_90mm

I can’t resist to the temptation to add a “behind the scenes” shot with a NEX+ CV 15mm, which is a bit unfair as it is overexposed and badly framed, being shot  “as is” while setting up the LF camera framing.

Making of Manhattan Bridge shot

Posted in 4x5 | Tagged | 5 Comments

Voigtländer (Nokton and Skopar) in contra light

In the former post I explained why I loved  the “cheap” Voigtländer lenses: they perform well in contra light and harsh light, which is a situation (in my humble opinion) where you can sort averages lenses from good ones.

I used to rely on FTM charts when it came to decide wether a lens was good or not. This is a part of the problem, but some other parameters are important too:

– does it have a nice bokeh?

– how does it handle contra light?

Usually a well designed lens (Mamiya 6 and 7 system’s lenses, any post 70’s Zeiss lens I know of either Hasselblad, Zeiss-Sony, ZF mount or M mount, Leitz, some Nikon or Canon, Contax, I may forget some) with good lens coating has good FTM and low flare (this is linked but not as simply as I thought)

Bokeh is a combination of focal length, aperture, diaphragm shape, optical formula and coating too.

If I look at FTM only, I can say to myself: “Heck, stick to your good old Nikon 50mm f1.8, the hell with any other expensive toy”

While this can be true in controlled conditions (carefully thought studio shots), many shot will be stunning using a ZF Zeiss and average to bad using the Nikon (which is a pretty good lens, especially when it comes to costs!)

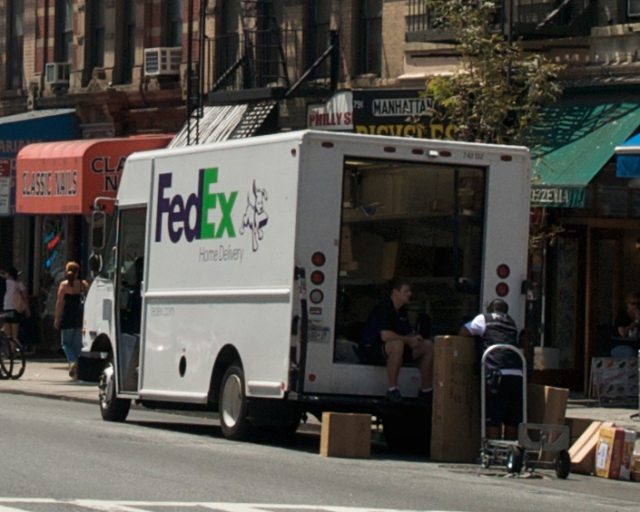
The following shot was taken using a Zeiss 21mm ZF on a D300, while I tested it just as I walked out B&H in NY (I’m not sponsored, don’t Ken Rockwell me!). I just wanted to be sure it was OK before I took the plane and brought it back to my friend who “ordered” it to me.

NY street shot in mid-day light (Zeiss 21mm + D300)

NY street shot in mid-day light (Zeiss 21mm + D300)

Here is a crop of the truck, to illustrate how “non-milky” this shot is: you can see the inside of the truck, which is in the shadows right beside a white zone.

Crop of the above picture

Crop of the above picture

I bothered you with the reason why I shot this picture as a test, because I never would have shot anything in such a harsh mid day light, which is well knows to turn any picture into a disaster, opposed to the golden hours of the sunrise and sunset during which you can get stunning results when shooting landscapes. But that was before I tried the Zeiss!

I hope I’m not the only one to find this picture cristal clear in spite of the terrible light. This is not contra light but it is an example of the “Zeiss look” I’m now looking for when I try to find a lens that would suit my needs: limpid results, no matter how the lightning conditions mess with you (-:

Now for the contra light:

Contra light Nokton 35mm @f1.4 + NEX3

Contra light Nokton 35mm @f1.4 + NEX3

On the above shot you can notice a ghost of the neons right under the lantern’s red fringe (above the guy enjoying his meal in the background), but not a flare which would give a low contrast look to the picture. I would never even consider shooting this kind of picture with an “average” lens. I’m not snob, I use my “all-plastic bargain” Nikon 18-55 DX a lot, but not when light is complicated. In easy light I cant’ tell it from a Zeiss.

Contra light(s)Skopar 21mm @f11

Contra light(s)Skopar 21mm @f11

I guess anybody who experienced urban night photography already ran into a huge problem: street lamp right in the middle (or worst, in a corner) of the otherwise perfect composition.

Well this time, while the picture may not be outstanding, I decided to try it just to benchmark the lense. You can notice the star shaped street lamps, showing the diaphragm was tightly closed (some geeks can even guess the number of blades from punctual light star shapes…)

Other than the two yellow “stars”, the picture remains clear, don’t you think?

Contra light (contra sky!) Skopar 21mm + NEX3

Contra light (contra sky!) Skopar 21mm + NEX3

To be even worse, I tried this shot, as the famous asian white skies are a lense’s nightmare. I still remember Angkor and this extremely bright white sky which annoyed even my Schneider super angulon.

On this picture, still no loss of contrast due to flare, check out the building on the right, it’s border with the white sky is not bleached. By the way you can guess on this picture the purple vignetting mentionned in my former post, I didn’t remove it completely as I haven’t done a correct mask for Corner Fix yet (my ceiling wasn’t a good white uniform pattern enough)

I hope I didn’t bother anybody with these picky geek considerations about lenses, after all that’s what this blog is about…

Posted in Hong Kong, Philosophy | Tagged , , | 2 Comments

Hong Kong debriefing (2/2)

Today’s post will focus on the lens adapter: “Hasselblad to Nikon” and “Leica M to Sony NEX” and the Voigtlander M mount 35mm f1.4 and 21mm f4.

First, lets see the Voigtlander 21mm f4 I bought in Hong Kong (400 USD)

Voigtlander 21mm f4 Skopar on an M6

Voigtlander 21mm f4 Skopar on an M6

Here it’s coupled to an M6 but of course it can be used on a NEX with the matching adapter, as well as the 35mm f1.4 you’ll see below (by the way the above picture was shot using a NEX3+ Voigtlander Nokton 35mm f1.4)

A NEX3 + Voigtländer Nokton 35mm f1.4 M mount

A NEX3 + Voigtländer Nokton 35mm f1.4 M mount

Above picture as been taken using a Zeiss 80mm f2.8 T* coupled to a D300, which setup is shown in the following group of picture (taken with the 35mm Nokton coupled to the NEX3):

Hasselblad (Zeiss) 80mm f2.8 with an Haselblad to Nikon adapter

Hasselblad (Zeiss) 80mm f2.8 with an Haselblad to Nikon adapter

Hasselblad (Zeiss) 80mm f2.8 on a D300

Hasselblad (Zeiss) 80mm f2.8 on a D300

On this picture you can see the Nokton @f1.4 is “creamly” soft, it’s out of focus zone being a bit prone to flare, as seen on the Nikon logo of the D300. This is OK for portrait when you usually need to be rather soft, and this softness disappears one or two stops away from f1.4, around f2.8. And keep in mind I bought it around 500 USD brand new, a Leitz 35mm f2 costs around 2000 USD and a f1.4 more than 4000 USD. I know the quality is not exactly the same, but for those like me who praise quality and price VS quality, the choice goes to Voigtländer. By the way, I’m also aware the NEX3 is only APS-C, not full-frame, and I’ll live with it (-; One day I may buy an M9, if the digital rot brings the price down to around 1000 USD. Otherwise I’ll go on shooting something else.

Back to my adapters: the manufacturer was clever enough to add a tripod mount to the adapter, takin into account that even a D300 or D700 doesn’t compete with the Hasselblad Zeiss when it comes to weight…

Tripod mount on the Hasselblad to Nikon adapter

Tripod mount on the Hasselblad to Nikon adapter

Now, here is a close up on the M to NEX adapter:

M (Leica) to NEX adapter

M (Leica) to NEX adapter

It’s pretty well built, 100% metal and was cheap (around 30 USD). I was happy to be able to handle it before buying, otherwise I may have doubted the quality of the hardware based on the price. It doesn’t mean anything found on ebay is OK, but be aware this is possible. Some Paris based shop sell it for around 150 euros (180 USD). Amazing.

In the next post I’ll try to give you an idea of the pros and cons of the above mentioned coupling, and try to compare it with “regular” lenses to see if all this is worth it.

I don’t have the answer yet but from my first non scientifically-backed test, the Voigtländer have what I was seeking: they give the “flare less” feeling to my pictures, especially when I’m optimistic enough to shoot in contra light. Even if it is soft @f1.4, the Nokton doesn’t give milky results when a bright light (or a window) is in the center or the corners of the picture.

A con I already knew: the 21mm f4 has a kind of “purple” vignetting, which it also has with a M8 or a M9. This is due to the almost horizontal ray of light which strikes the corner of sensor, due to the fact that the rear elements of the lens are close.

This was however successfully fixed with the excellent and free Corner Fix.

Stay tuned (-;

Posted in Lens adapter | Tagged , , , , , | Leave a comment

Hong Kong debriefing (1/2)

Where you’ll learn about my old school style when it comes to 4×5 composition, and discover an amazing tiny shop full of treasures…

First off, here is the setup for my 4×5 shot followed by the result. I usually don’t shoot my gear during a session but I find the Graflex look somehow “chic”, one may say I’m a snob. Well I guess I am (-:

Graflex setup in Hong Kong

Graflex setup in Hong Kong

And for the result:

4x5 shot of the Hong Kong bay (Speed graphic, Super Angulon f8 @f32, Fuji 160S)

4x5 shot of the Hong Kong bay (Speed graphic, Super Angulon f8 @f32, Fuji 160S)

As stated in the introduction, this is an ultra-classic composition, with maybe too much water, but I decided to keep it this way, because 4×5 will never look like our well-known 3×2 with its rule of the third. And when a sheet costs 3 euros to buy and 4 euros to process, you keep it simple, not to mention working with film you get the results once back home…

As far as sharpness is concerned, I must confess that a 7 images stitched panorama with a D300 and a decent optic looks almost as detailed as my scan, but:

– my scan is an amateur flatbed, one day I may have my favourite sheets drum scanned and we’ll see…

– the subtle tone ranges in both the sky and the water are more “eye candy” on the 4×5 than on my digital stitch.

– the graflex is fun to use!

I’m not at war against digital, I use it a lot, and I even bought a NEX3+M mount lenses, which I’ll present in my upcoming post.

Now it’s time to discover a gem: a tiny shop held by a very nice man, right in the middle of the “Golden Computer Center” in Kowloon, next to the Sham Shui Po MTR station.

In this place I found by chance while looking for cheap laptops, I was lucky enough to find ANY adapter (made of metal and matt black coated) I asked for: M to NEX, Hasselblad to Nikon, Nikon to NEX, lens and body caps of any brand, and so on… and he had everything!

And the real deal was that the average adapter price was 35 euros (350 HK$). Amazing

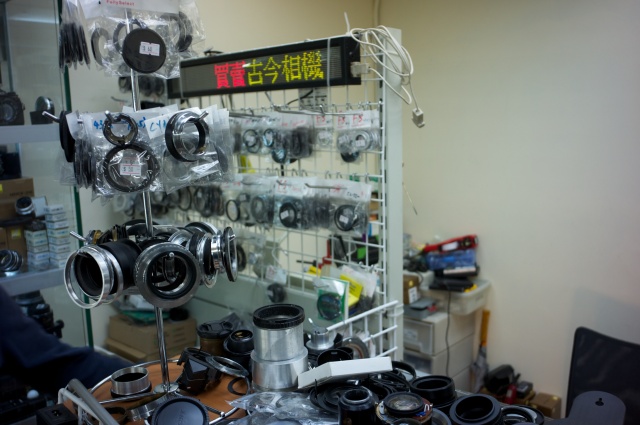
A tiny part of the available adapters

A tiny part of the available adapters

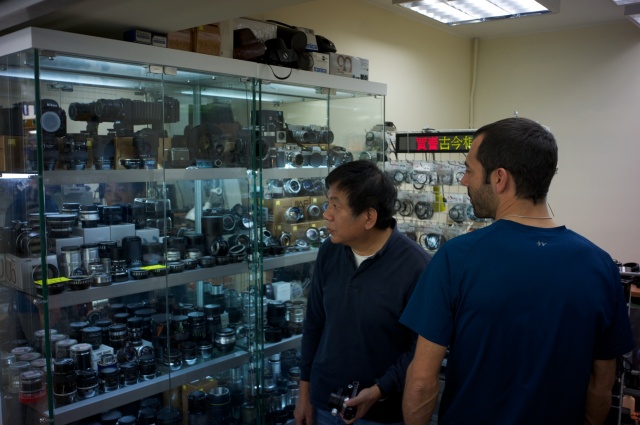
The neat guy was nice enough to let me try all combination and shoot pictures with his bodies before I bought the adapters. While we discussed with him (together with my friend you see on the pictures) he showed us another side of his work: how he managed to fit non reflex Zeiss lens (rather long focal to be OK to focus at infinity) into discarded Nikon lens barrels, to turn it into a Nikon compatible lens. See below.

The shop owner explaining us his work

The shop owner explaining us his work

A Contax G Zeiss 90mm f2.8 fits into a Nikon 50mm f1.8 barrel!

A Contax G Zeiss 90mm f2.8 fits into a Nikon 50mm f1.8 barrel!

By the way these last three shots were taken with my NEX3 and an M mount Voigtlander 35mm f1.4, to test the adapter I was about to buy, so you’ve got first samples of the “look” of the lenses on a 14Mpix APS-C sensor (I guess it’s the same as the D7000).

Stay tuned, part 2/2 of this debriefing is soon to be posted!

Posted in 4x5, Hong Kong | Tagged , , , | Leave a comment

Hong Kong trip debriefing (teaser)

Hong Kong large format setup

Hong Kong large format setup

I usually don’t like teaser when I’m a victim of it, especially since videogame industry uses this mind twisting method years before the release of what tends to be average products.

The only reason why I do this is because of the lack of time which keeps me from debriefing my trip to Hong Kong right away. In spite of that I wanted to share with you what pleased me the most (aside delicious food): good photo gear prices in a town where you can enjoy it right away, in fact just like New York (a town I like even more, as you can see if you browse my website‘s galleries)

My next post will be about 4×5 (see the picture of my beloved Speed Graphic at work!), NEX+M mount Voigtlander lenses (31mm f1.4 & 21mm f4) which I bought and used there, and a wizzard shop where I found anything I wanted related to lens adapters. Stay tuned!

Posted in 4x5, Hong Kong | Leave a comment

Less is more (part 2/2)

Leica M6 with Elmar 50mm f2.8

Leica M6 with Elmar 50mm f2.8

I know a Leica is not exactly as “bare photography” as a pinhole, but it’s a lovely camera and fits in the “less is more” category for the following reasons:

  • As his collegues full manual film SLR, there are no fancy menu to get lost in: speed, aperture and focus. That’s it.
  • The mirror-less design enables the use of very simple optic formula, which, when built with excellent lenses as the Leitz or Zeiss ones, provides outstanding results (FTM, flare)

As strange as it may sound, having to deal with manual exposure make things easier once you get used to it, compared to DSLR or modern automated film SLR.

When shooting landscapes or street scenes, the light seldoms changes in a 15mn time frame (except when clouds mess up with the sun), and that’s true for indoor portraits too, when using available light. So once you’re set, the only thing left to do is compose, focus and shoot.

When you choose your exposure, you usually aim for a mean grey (or the palm of your hand in what you consider the average light). This gives you a starting point, and then you can adjust, depending on what you shoot and where is stands, or if you want to shoot against the lights and keep only people’s shapes against a blown up background.

With modern matrix exposure or even weigthed centered measurment, you always do and re-do the ligth measurement, sometimes locking with AE-L. The more intelligent your system, the more picky you get in case it would mis-estimate what you would like. You’d never mess with matrix system adding exposure correction as it is far from being linear.

That’s of course if you’re into zone system, and such things as controlling your exposure.

And as stated in former posts, the mirrorless designs (viewfinder, large format, twin lens reflex) are, in my humble opinion, better than the equivalent reflex systems.

Try to get the results of a Zeiss Biogon with a SLR: I guess you can’t. Even Zeiss’s own 21mm for Nikon has (besides it’s magificent FTM and flare performances) distortion.

And it costs a lot…

Enought talking, here are some shots taken in La Defense (business quarter near Paris) with the M6 I borrowed from my stepfather (may he be thanked enough for trusting me).

As the light was hard (noon…) and I had roughly one hour during my lunch break, I choosed to shoot a lot to fill my 36 exposures, and use a fim with hard contrast -Rollei ortho 25- processed in Paterson FX39.

La Defense Elmar 50mm Ortho25 FX39

La Defense Elmar 50mm Ortho25 FX39

This is an example of adjusting the exposure to shoot against the light: you set yourself up for the indoor grey, and -3EV to turn people into deep black shapes.

La Defense Elmar 50mm Ortho25 FX39

La Defense Elmar 50mm Ortho25 FX39

The grey was measured on my hand, and I shot the buildings with this setting, this is also true for the two following pictures.

La Defense Elmar 50mm Ortho25 FX39

La Defense Elmar 50mm Ortho25 FX39

La Defense Elmar 50mm Acros100 FX39

La Defense Elmar 50mm Acros100 FX39

For this last shot I used the viewfinder, which is wider than the actual lens field-of -view, so I saw the pedestrian was about to enter in the lens’ FOV, I had the timing I wanted. Before that I was framing to have my own shade positionned as I wanted, I didn’t expect a pedestrian but decided in the second it would be a stronger shot with him passing by.

This is a strenght of viewfinder camera which is usefull when shooting street scenes, when timing is of the essence…

The essential thing in all of this litterature is: I enjoyed taking photographs that day, that’s a feeling I hadn’t had for a long time. Like when using large format, sometimes you go home with no decent shot, but you enjoyed it (-:

Posted in Philosophy | Tagged | Leave a comment

Less is more (part 1/2)

DIY pinhole on my pre anniversary speed graphic

First of all, the “Less is more” philosophy, according to Wikipedia, comes from

“Less is more”, a phrase from the 1855 poem “Andrea del Sarto” by Robert Brownin the phrase as adopted by the architect Ludwig Mies van der Rohe as a precept for minimalist design.

Ducati 900 SuperSport

Ducati 900 SuperSport

This can of course be applied to countless domains, as cooking, motorcycle (the amazing Ducati Monster, or my beloved 900 Supersport now that the fairings are removed…) and of course photography, for style as well as gears.

I decided to try to simplify the way I take pictures after I brought back thousands of shits shots from my last trip, shot with my DSLR (which by the way I like a lot but it tends to make me lazy). For landscape photography, from now on, I’ll try to stick with simple tools. For sports I think I’ll keep my D300 and a 180mm f2.8. I used film SLR before and I can say that at least for tennis the D300 is a blessing!

Even if I’m keen on great prime lenses, I wanted to try pinhole photography.

I know pinhole photography from way back: as a student, our physics teacher made us build one with a shoe box and translucent paper as groundglass. I never imagined it could produce quality photographs so I had considered it a hobby and didn’t want to spend time on it.

But one day I saw stunning shots done with a wide angle pinhole in a church or for “regular” landscape. As an example here are beautiful and technically impressive landscapes shot by Scott Speck. Take a look at his gallery, it’s amazing.

Footbridge in the Mist (Scott Speck Pinhole Photography)

Footbridge in the Mist (Scott Speck Pinhole Photography)

Gothic Study Hall (Scott Speck Photography)

Gothic Study Hall (Scott Speck Photography)

Spiral Staircase Beneath the Cathedral (Scott Speck Pinhole Photography)

Spiral Staircase Beneath the Cathedral (Scott Speck Pinhole Photography)

I searched a bit about it and understood that the fact that pinholes are distortion free gave this special look when shot with a short focal length (like 40mm on a 4″x5″). And there is no flare either because there simply is no lens in the way.

Of course diffraction is a mess and the image is a circle so the corners are soft and have aberrations, but all in all (don’t forget the virtually infinite DOF) it makes a unique “touch”. Furthermore real aperture and FOV computing and determining exposure times (reciprocity failure tends to give exposure times counted in hours!) teaches a lot and is FUN.

Once I’ll have processed the roll, I’ll post the results of my first 120 film, shot using my speed graphic (with rollfilm back) with a cardboard drilled with a 1mm hole, then a tiny (300um I guessed) DIY pinhole in aluminium shim (see the picture above) . Even if the results were lame, this journey helped me to understand more things about view cameras in general, and once again, I enjoyed it. No wonder Ansel Adams mentioned pinhole photography in his books (-;

Set for a test with a pinhole mounted on a 4"x5" Graflex

Posted in Philosophy | Tagged | Leave a comment

Pixel freak…

More on 4″x5″: a classic 100% crop of a previously posted image.

The original 140Mpix picture cannot be displayed properly on the web (or I’d have to master dynamic flash viewer or such a mess) but I selected an area which is displayed at native resolution.

4"x5" example: Delta 100 + FX32

100% of the selected area (Super Angulon 90mm @f32):

Détail (cliquer dessus pour avoir vraiment 100%)

Détailed crop (click to see actual 100% view)

If you’re bored to death (maybe waiting for a 250 NEF panorama to crash your computer while stitching and dropping 130Go of temporary files before dying, as mine did) you can count the flowers surrounding the Apsara sculpture.

This is a 3200dpi un-sharpened scan. As can be seen the Delta 100 (in FX39) grain is not even noticeable

I guess there is more in my negative than displayed, and maybe sharper. However, having used f32, I may suffer lens diffraction, so maybe I already got almost everything out of this shot. The only issue may be the Epson 4870, which, while good, doesn’t produce scans as crisp as an Imacon or a drum scanner.

Anyway as it is, it can produce huge prints, which I may not dare to order to a lab, except if I get a place for an exhibition. Even then, a 40″x50″ laminated print would cost me an arm and a leg!

One thing I didn’t mention yet : seeing a scene on a groundglass is breathtaking. I already had this feeling while using the Hasselblad without a prism, but on a huge groundglass, I’m amazed each time I use my Graflex. It looks like 3D picture popping out, even if I know it isnt’ 3D. And you can focus using a quality loupe on the groundglass, so the focus is insanely precise.

I’m really pleased about my “LF wide angle kit”, even more when I think about the Hasselblad SWC, a camera dedicated to a single lens: Carl Zeiss’ 38mm Biogon. I think about the price, the fact that it’s not easy to use either, and that it shoot “only” 120 film. No troll there, it’s just my opinion.

I didn’t mention it yet, but for an architecture freak like me, a great feature is the “rise” movement, to avoid perspective issues. While being a large format camera, my antique camera only allows rise, no fall, shift nor tilt. This handicap is no big deal (I paid 130 euros for it!) and made it possible for me to get used to it in two photographs, and then jump in the plane that brought me in Cambodia. I hesitated before taking it on a trip given the fact I didn’t master it well, but I had to try. And I’m pleased I did. Had I played with tilt, I may have gotten lost.

In the next posts I’ll show the camera and the lens in detail, explain how I built a lensboard and how to load film holders (and how to fight monsoon humidity!!!)

Posted in 4x5 | Tagged , , , , , , | Leave a comment

First steps in large format

As told in my former post, here come the first images done with a pre-anniversary Speed Graphic and a Schneider Super Angulon 90mm f8:

Ta Som, Angkor, Graflex & 90mm-f32, Delta 100 & FX39

Another one with a decent light (5 mn sunlight before the daily monsoon storm…)

Preah Khan, Angkor, Graflex & 90mm-f32, Delta 100 & FX39

As stated before, before I took the decision to enter the large format “madness”, I read a lot, especially  http://www.largeformatphotography.info

It convinced me that, while on a budget (this time I didn’t sell my other gear), one could buy a vintage (1936) camera and a used coated lens (manufatured in the 70’s) and produce breathtaking results, at least technically. I haven’t forgotten that a good photographer with a crappy camera can produce stunning pictures, while the other way around, a fool with the best gears ever manufactured will still shoot crap. This is why I struggle to improve my skills, but having a LF camera kind of motivates me while it forces me to slow down. And that’s a good thing in my opinion, even if it keeps you from taking some pictures.

I won’t mess with “is it better than the top digital cameras + top lenses?“.

What matters is how I enjoy the 15mn I need to set it up, how it forces me to go back to the basics, and how pleased I will be if one day I shoot a photo I love, it will be stored on an amazing media.

So, how come it’s the cheapest kit I ever bought?

  • Speed graphic pre anniversary + 1936 135mm Zeiss: 130 Euros
  • 5 film holders: 100$
  • Schneider 90mm f8 (Biogon “like”) with shutter: 250 Euros

My bare FM2 cost me 600 Euros back in 2002, My bare F100 800 Euros, My bare D300 1000 Euros, same price for my Hasselblad kit.

My LF gear cost me less than 500 euros. And I get 4″x5″ (-;

I know I have to pay big bucks for film, but B&W is rather cheap (less than 0,7 Euros a sheet) and I process it myself. And as I already mentioned it, LF is a slow process, I shot 12 scenes (with backups on Portra just in case) while staying one week at Angkor. All in all 24 sheets for a trip. Quite furgal isn’t it? The 12 were exposed OK and sharp. And 8 out of 12 were “keepers”.

You may see for yourself:  http://stephanelecoanet.com/portfolios/Angkor-LF/

In the next post I’ll deal with the detail I manage to squeeze out of film sheets with and “OK” flatbed scanner. Stay tuned!

Posted in 4x5 | Tagged , , , , , , , | Leave a comment

Welcome!

This is the inaugural post of DreamLenses, AKA “Lenses, film and silicon”.

My wish is to share my love for photography in general, especially the film photography and the huge amount of wonderful cameras and lenses available on the used market.

I say used but one may want to buy new ones. They cost almost the same price as when they ruled the market… Fancy a Mamiya 7II and a 43mm? This kit is around 5400$ if you buy it new today. The same kit in good condition may be found for 2000$ used. This is still a huge amount of money, but it could be achievable by an amateur.

My personal journey towards film photography was a bit “disturbed” buy the emerging DSLR lineup in the past few years:

  • 2002

Being horrified by my Ixus (the first one, remember!) results I decided to learn”from scratch” by borrowing my stepfather’s Minolta SRT101 and his trusty fixed focal manual lenses.

I enjoyed it so much I bought a used Nikon FM2 and a 50mm f1.8 AIS. Back then I didn’t realize how good this lens was: “natural” FOV, bokeh, sharpness when stopped down. It was just the only one I could afford!

  • 2003

I’m keen on tennis, so, to shoot at Roland Garros I treated myself with a used F80 and a used 180mm f2.8 (the same that’s still in Nikon catalog as of 2010). Adding a used film scanner (LS2000) I like to think about it as a 10Mpix set, when the 6Mpix D100 and EOS10D was the first “serious” DSLR, quite expensive indeed.

  • 2004

I was lucky enough to travel to New York and buy a F100 there. A new one I must confess, it was less than a used one in Paris.

Back then I tried many slides and negatives both for sport and landscape photography, and became fond of PROVIA and TMAX400, while I still struggled to find a colour negative that pleased me. And I’m still looking.

  • 2005

Being used to find deals in the US, I bought a Mamiya 7 (the “old” one) with a 43mm Biogon at MPEX. I guess my love for lenses come from this one. I loved photography, but I wasn’t aware lenses could perform so well, so a lens could add to the soul of pictures. I still think it’s not about the camera, it’s about the eye brain behind it. But has any of you ever used what he would call “THE” lens? Then it makes you want to shoot better and more. That was the case for me, it fueled my interest in photography.

By the way with this gem, I bought a decent flatbed scanner to squeeze the most I could (not enough, this is no drum scanner, but hey…) so then I had kind of a 60Mpix rangefinder camera (-:

I made  a big mistake the year after: I sold it to avoid having 2000$ sleeping on my shelves: I could only use it for specific work (landscapes, and not any landscape, you need a foreground…) and thought I didn’t use it often enough. Now I regret this choice, but as you’ll see my love for non reflex lenses grows on, and the 43mm was the initiator.

Enough theory, here’s what I was able to get with it:

M7II+43mm from top the Empire State Building

M7II+43mm from top the Empire State Building

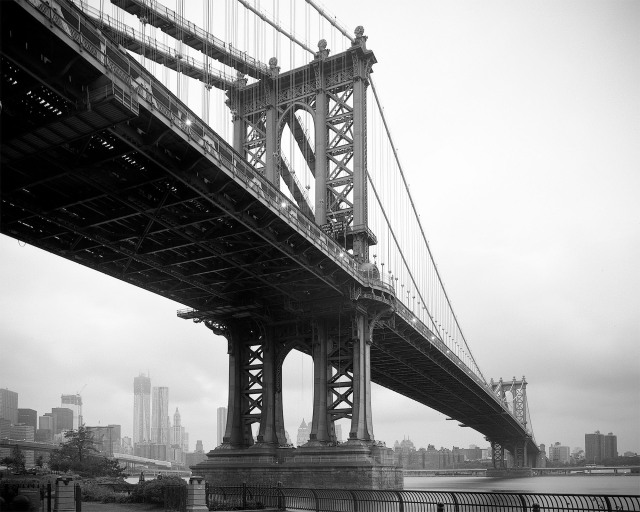
M7II+43mm: Manhattan bridge

M7II+43mm Manhattan bridge

M7II+43mm: Time Square

M7II+43mm: Time Square

  • 2007

The DSLR were then mature enough to my taste so I threw big bucks in a D300 while in NY. I don’t regret it, since it hasn’t suffered “digital rot” yet and it already performed well (night shots, panoramas, tennis, landscapes). While I was shopping, I couldn’t resist an Hasselblad kit with the 80mm f2.8 planar with a back and a prism for 1000$. NY is great for camera deals, especially if you live in Paris where used Hasselblad trade for three times this price.

By reading these lines you could think I’m a spoiled kid, but I almost always sell my gears to be able to move on. And that’s true , I’m a spoiled kid.

  • 2010

Still dreading the day I sold my 43mm, I was reading through forums and websites, and the idea of stepping into large format grew, especially after I found out this could be the cheapest set of hardware I’d have to buy. And that’s the case! What’s the link with the 43m? Well, for 4″x5″, you can afford to buy a multicoated Biogon for 250$ or so, and it gives sheet film quality. Even not as sharp in terms of pure FTM as a Leica or Zeiss M-mount 21mm, a huge sheet of film produces far more detail than a 135 image (at the same FOV of course).

In the next post I’ll explain it, what made me brave enough to try it and why I’m pleased I did.

A little image to tease a bit:

Pre anniversary Graflex Speed Graphic

A clue: 1936

The next post will feature images taken with this vintage tool, which tend to draw attention and even often gentle sarcasm when people see me use it. You see, the have such wonderfull DSLR (some are even full frame,My oh My,  figure it out (-; ) and I use an outdated gear made of wood and leather (and a bit of glass), my head hidden under a crappy black T-shirt. Poor me.

Posted in 4x5 | Tagged , , , , , , , , , | 2 Comments